2012年6月15日 星期五
Xcode-iOS 開發環境設定
若是使用自己的 apple id 取得 ios developer program 則直接參考 此聯結 做設定。
若是某人已取得 ios developer program ,要讓自己也可以開發 ( 不同/或相同的電腦,
作業系統裡使用不同的使用者帳號名稱 ),
則按下列步驟設定 :
使用已取得 ios developer program 的 apple id 到此頁面,按下 invite person ,邀請自己,
按下後自己將收到邀請函,按下邀請函上面的連結之後,會開啟網頁詢問是否已有 apple id,
若已有 apple id,登入過後就會發現自己的 apple id 也加入 ios developer program 了。
( 尚未測試 ) 若是某人已取得 ios developer program,後來再買了一台電腦,
想要在另一台電腦上也可以開發 ( 不同的電腦,作業系統裡使用相同的使用者帳號名稱 ) ,則按下列步驟設定 :
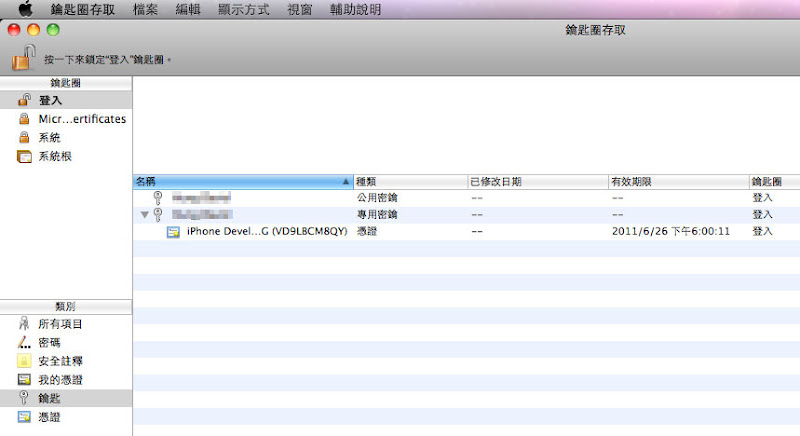
至 applications > utilities > Keychain Access 選擇左下方 ‘Keys’ 。
找到具有 iOS Development Certificate 的 private key,按下右鍵 (control +左鍵) 選 export ...。
最後會得到一個 (.p12) 的檔案。
將檔案複製在另一台電腦並安裝之。
因為 Snow Leopard 上的 xcode 只到 4.2 版就沒有再更新了,
因此若手機上的 iOS 是 5.1 版,則要升級作業系統至 Lion ( 才可安裝 xcode 4.3 以上版本) 或
將手機 iOS 降級至 5.0 才可讓 xcode 支援使用。若不想升級作業系統或降級 iOS,
http://forum.unity3d.com/threads/130953-Tip-Using-XCode-4.2-on-Snow-Leopard-to-test-with-iOS-5.1-devices
還是可以按照下列步驟將 iOS 5.1 SDK 強制安裝至 xcode 4.2:
https://developer.apple.com/downloads/index.action#
進入 terminal (applications > utilities > terminal ),依序輸入下列指令 ( 此指令是針對 xcode 4.2 安裝至 /Developer )
sudo cp -R /Volumes/Xcode/Xcode.app/Contents/Developer/Platforms/iPhoneOS.platform/Developer/SDKs/iPhoneOS5.1.sdk /Developer/Platforms/iPhoneOS.platform/Developer/SDKs/
sudo cp -R /Volumes/Xcode/Xcode.app/Contents/Developer/Platforms/iPhoneSimulator.platform/Developer/SDKs/iPhoneSimulator5.1.sdk /Developer/Platforms/iPhoneSimulator.platform/Developer/SDKs/
sudo cp -R /Volumes/Xcode/Xcode.app/Contents/Developer/Platforms/iPhoneOS.platform/DeviceSupport/5.1\ \(9B176\) /Developer/Platforms/iPhoneOS.platform/DeviceSupport/
sudo rm -f /Developer/Platforms/iPhoneOS.platform/DeviceSupport/Latestcd /Developer/Platforms/iPhoneOS.platform/DeviceSupport/
sudo ln -s ./5.1\ \(9B176\) ./Latest
Xcode - Snow Leopard 使用 Xcode4.2 如何讓 IOS 5.1裝置認證過關
首先下載xcode4.3 雙擊dmg文件打開右鍵xcode圖標瀏覽裡面的內容拷貝出上面所說的文件夾過程如下:
1. 複製文件夾Contents/Developer/Platforms/iPhoneOS.platform/DeviceSupport/5.1 (9B176) 到系統文件夾Developer/Platformes/iPhoneOS.platform/DeviceSupport
2. 複製文件夾Contents/Developer/Platforms/iPhoneOS.platform/Developer/SDKs/iPhoneOS5.1.sdk 到系統文件夾Developer/Platformes/iPhoneOS.platform/Developer/SDKs
3. 複製文件家Contents/Developer/Platforms/iPhoneSimulator.platform/Developer/SDKs/iPhoneSimulator5.1.sdk 到系統文件夾Developer/Platformes/iPhoneSimulator.platform/Developer/SDKs/
4. 5. 同樣的方法把version.plist 和docsets 拷貝過去
xcode-如何將App安裝至自己的iPhone測試
在一切開始之前
首先先將你要測試的iPhone手機裝上 Ad Hoc Helper 這個程式。

這個程式可以將手機的資訊寄到你指定的Email裡,我們主要是需要抓手機的Device ID,Device ID是像這樣一串的16進位編碼字串 4f635dc13835007c3xxxxxxxfa9d4e651605f092,共有40個characters。
首先先將你要測試的iPhone手機裝上 Ad Hoc Helper 這個程式。
這個程式可以將手機的資訊寄到你指定的Email裡,我們主要是需要抓手機的Device ID,Device ID是像這樣一串的16進位編碼字串 4f635dc13835007c3xxxxxxxfa9d4e651605f092,共有40個characters。
在Mac上建立Login Certification
1. 開啟應用程式 → 工具程式
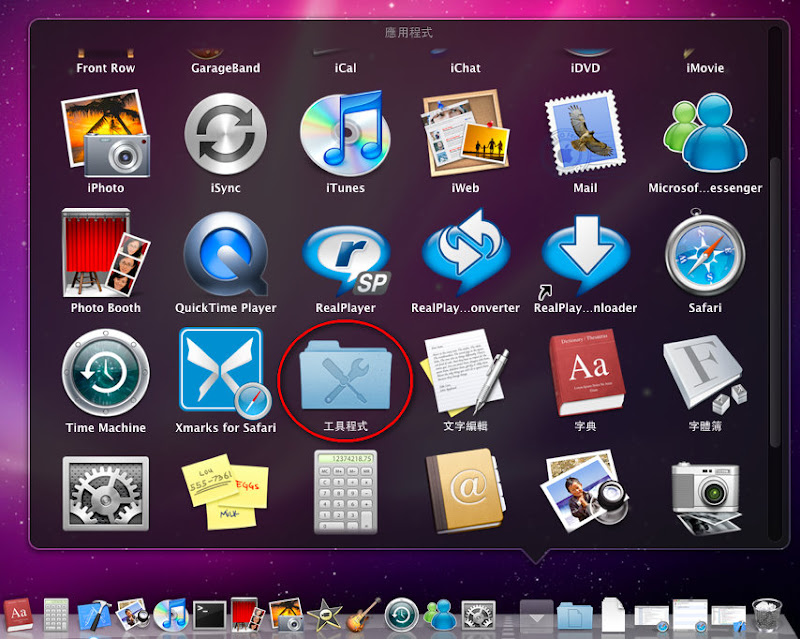
1. 開啟應用程式 → 工具程式
2. 點選鑰匙圈存取 (keychain)

3. 開啟 keychain 程式後,由鑰匙圈存取 → 憑證輔助程式 → 從憑證授權要求憑證

4. 輸入你的Email及名稱,然後勾選儲存到磁碟及指定密鑰配對資訊

5. 完成之後就會看到多了一個 Public Key 及 Private Key,並會在桌面上產出一個名為
CertificateSigningRequest.certSigningRequest 的檔案
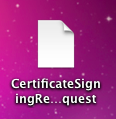
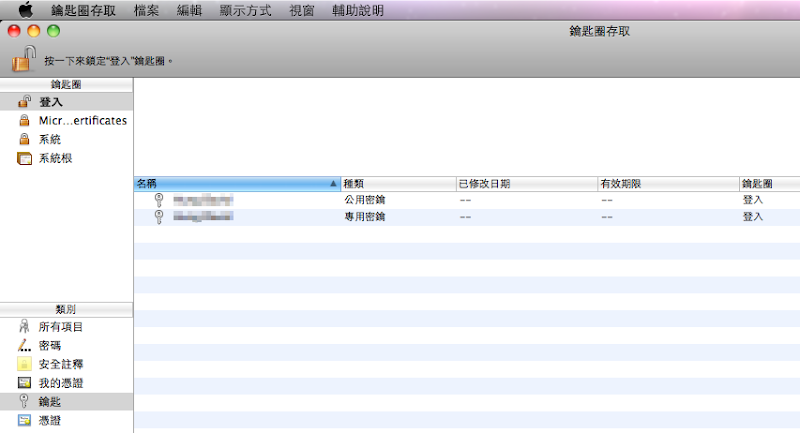
CertificateSigningRequest.certSigningRequest 的檔案
建立開發用憑證及App Provision
首先連到iPhone Provision Portal頁面
首先連到iPhone Provision Portal頁面
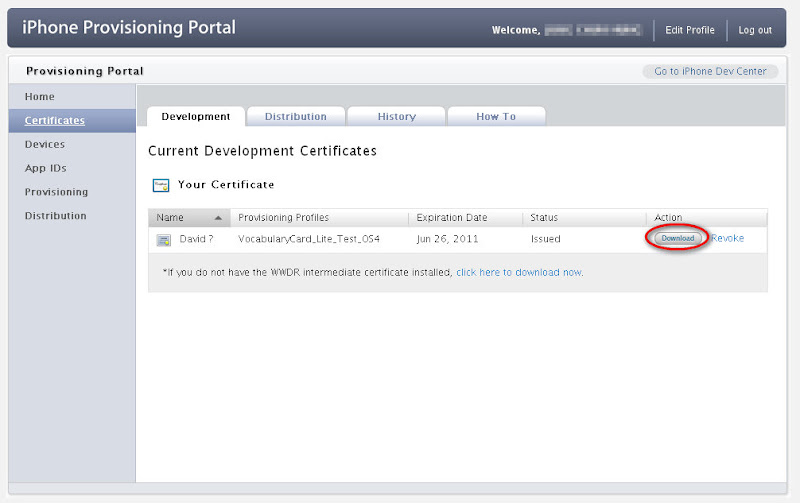
1. 建立開發用憑證。點選Certificates → Development → Request Certificate
若還沒裝過WWDR憑證(Apple Worldwide Developer Relations Certification)的話,下面那個Download連結也要點。點了之後會下載一個名為 AppleWWDRCA.cer 的檔案。
註: 如果是要正式發佈到App Store,則改成點選 Distribution頁籤
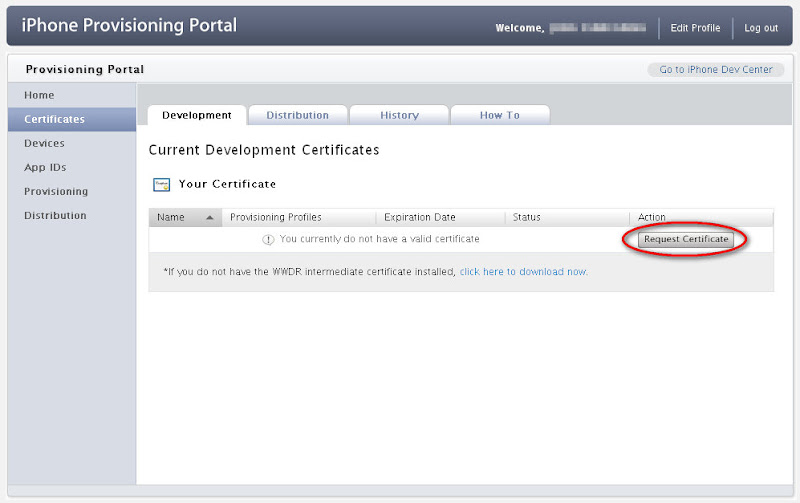
若還沒裝過WWDR憑證(Apple Worldwide Developer Relations Certification)的話,下面那個Download連結也要點。點了之後會下載一個名為 AppleWWDRCA.cer 的檔案。
註: 如果是要正式發佈到App Store,則改成點選 Distribution頁籤
2. 點取”選擇檔案”,將剛剛在Mac上利用Keychain做出來的 CertificateSigningRequest.certSigningRequest 檔匯入

3. 匯入成功之後,就會看到已經產出了一個開發者憑證了,點選Download會下載一個名為 developer_identity.cer 的檔案
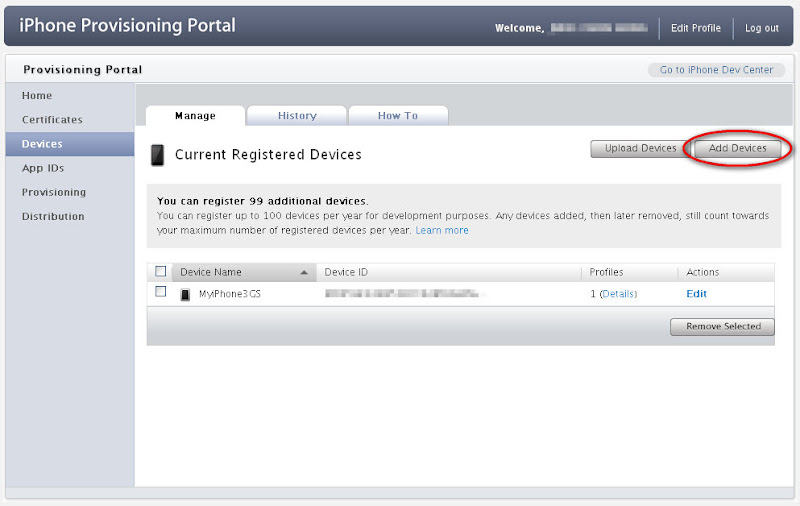
4. 建立測試Device清單。點選Devices → Add Devices,輸入你想取的名字及Device ID。Device ID即要靠一開始提到的Ad Hoc Helper程式得到
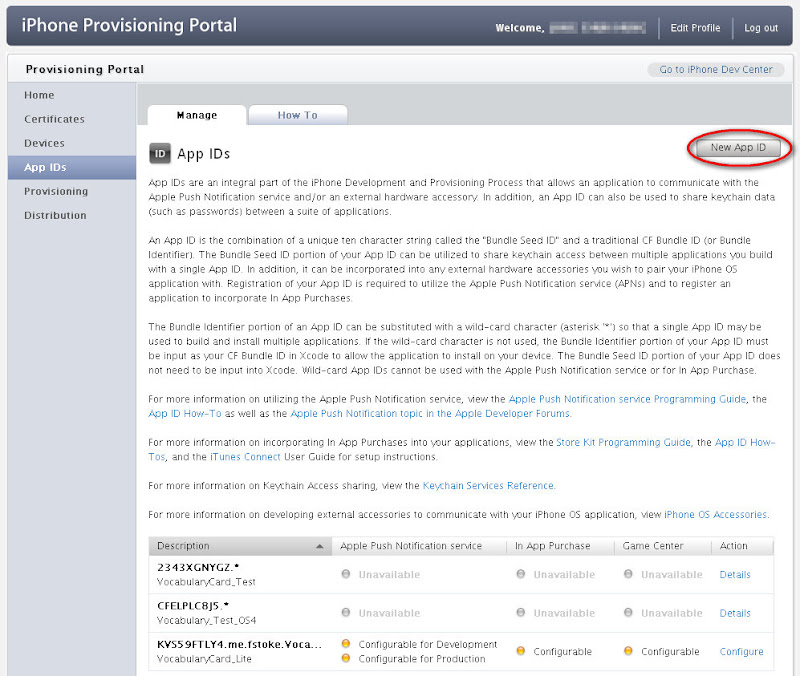
5. 建立App ID。點選App IDs → New App ID,照著表格填寫即可。請注意! 一旦建立一個App ID後,將永遠不能刪掉 (不知道以後會不會開放,Apple的說法是因為他們要留下來做記錄)。所以請不要建立太多App ID以免造成自己的困擾 (像我一樣… =.,=)
6. 建立Provision Profile。點選 Provisioning → Development → New Profile。照著表格填寫即可,建好之後點選Download會下載一個名為 [Profile Name].mobileprovision 的檔案
註: 如果是要正式發佈到App Store,則改成點選 Distribution頁籤

註: 如果是要正式發佈到App Store,則改成點選 Distribution頁籤
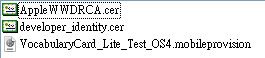
全部的動作完成之後,總共會得到如以下三個檔(或後兩個檔)。
7. double click developer_identity.cer 檔會開啟keychain,會看到已經多了一個iPhone Development的憑證。注意到上面有個Apple Worldxxx的憑證,即是 AppleWWDRCA.cer 憑證寫入的

點選Key,會看到Private Key已經與iPhone Development憑證做關聯了
點選Key,會看到Private Key已經與iPhone Development憑證做關聯了
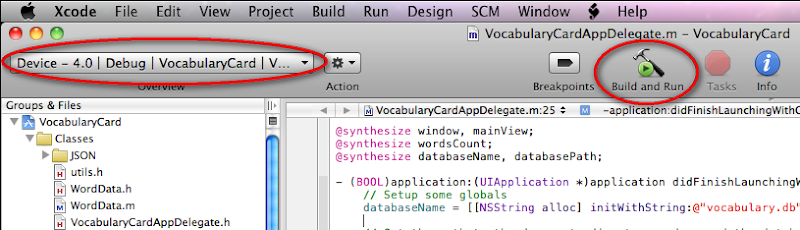
8. 將你的iPhone用傳輸線接好Mac。double click [Profile Name].mobileprovision 檔,即會開啟XCode的Organizer畫面,並將Provision安裝至iPhone裡。

9. Okay! 一切都準備完了,接下來就是開啟XCode將App Upload到你的iPhone上去囉。執行環境選擇 Device → Run! 等它跑完… 恭喜!! 你終於可以在你的iPhone上Run你的程式囉! 
GridView的表頭跨欄設計
if (e.Row.RowType == DataControlRowType.Header)
{
TableCellCollection oldCell = e.Row.Cells;
oldCell.Clear();//將原有的表頭格式移除

//產生多重表列的第一列
GridViewRow headRow = new GridViewRow(0,0, DataControlRowType.Header, DataControlRowState.Insert);

//第一欄
TableCell head2Cell = new TableCell();
head2Cell.Text = "單位";
head2Cell.BackColor = row1color();//自訂的方法用以統一取得色彩
head2Cell.HorizontalAlign = HorizontalAlign.Center;
head2Cell.RowSpan = 2;//所跨的欄數
headRow.Cells.Add(head2Cell);//新增自製的儲存格


//第二欄
head2Cell = new TableCell();
head2Cell.Text = "群組";
head2Cell.BackColor = row1color();
head2Cell.ColumnSpan = 8;//所跨的欄數
head2Cell.HorizontalAlign = HorizontalAlign.Center;
headRow.Cells.Add(head2Cell);//新增自製的儲存格

//第三欄
head2Cell = new TableCell();
head2Cell.Text = "聯絡人";
head2Cell.BackColor = row1color();
head2Cell.ColumnSpan = 3;//所跨的欄數
head2Cell.HorizontalAlign = HorizontalAlign.Center;
headRow.Cells.Add(head2Cell);//新增自製的儲存格

//第四欄
head2Cell = new TableCell();
head2Cell.Text = "行事曆";
head2Cell.BackColor = row1color();
head2Cell.ColumnSpan = 3;//所跨的欄數
head2Cell.HorizontalAlign = HorizontalAlign.Center;
headRow.Cells.Add(head2Cell);//新增自製的儲存格

//將自製的資料列新增上去
GridView1.Controls[0].Controls.Add(headRow);

//產生多重表列的第二列
headRow = new GridViewRow(0, 0, DataControlRowType.Header, DataControlRowState.Insert);

#region 群組裡的欄位

//用法都與第一列相同
head2Cell = new TableCell();
head2Cell.Text = "使用量";
head2Cell.BackColor = row2color();//自訂的方法用以統一取得色彩
headRow.Cells.Add(head2Cell);

head2Cell = new TableCell();
head2Cell.Text = "成員數";
head2Cell.BackColor = row2color();
headRow.Cells.Add(head2Cell);

head2Cell = new TableCell();
head2Cell.Text = "員工數";
head2Cell.BackColor = row2color();
headRow.Cells.Add(head2Cell);

head2Cell = new TableCell();
head2Cell.Text = "通訊錄量";
head2Cell.BackColor = row2color();
headRow.Cells.Add(head2Cell);

head2Cell = new TableCell();
head2Cell.Text = "檔案總數";
head2Cell.BackColor = row2color();
headRow.Cells.Add(head2Cell);

head2Cell = new TableCell();
head2Cell.Text = "總檔案量";
head2Cell.BackColor = row2color();
headRow.Cells.Add(head2Cell);

head2Cell = new TableCell();
head2Cell.Text = "檔案下載次數";
head2Cell.BackColor = row2color();
headRow.Cells.Add(head2Cell);

head2Cell = new TableCell();
head2Cell.Text = "下載磁碟總量";
head2Cell.BackColor = row2color();
headRow.Cells.Add(head2Cell);

#endregion

#region 聯絡人裡的欄位

head2Cell = new TableCell();
head2Cell.Text = "使用人數";
head2Cell.BackColor = row2color();
headRow.Cells.Add(head2Cell);

head2Cell = new TableCell();
head2Cell.Text = "聯絡人數量";
head2Cell.BackColor = row2color();
headRow.Cells.Add(head2Cell);

head2Cell = new TableCell();
head2Cell.Text = "同步次數";
head2Cell.BackColor = row2color();
headRow.Cells.Add(head2Cell);

#endregion

#region 行事曆裡的欄位

head2Cell = new TableCell();
head2Cell.Text = "使用人數";
head2Cell.BackColor = row2color();
headRow.Cells.Add(head2Cell);

head2Cell = new TableCell();
head2Cell.Text = "events_personal";
head2Cell.BackColor = row2color();
headRow.Cells.Add(head2Cell);

head2Cell = new TableCell();
head2Cell.Text = "events_group";
head2Cell.BackColor = row2color();
headRow.Cells.Add(head2Cell);

#endregion

GridView1.Controls[0].Controls.Add(headRow);
訂閱:
意見 (Atom)